horz1

Friday, February 1, 2013

Sansui TU-9900 (***Update#2****)

After trying for the past couple years, finally managed to secure the legendary TU-9900 thru eBay!

Was extremely disappointed when I received it - the original glass on the faceplate was cracked even though it was packed double box??? Otherwise the unit looked like new.

Upon unpacking 2nd box


During daytime

Lights visible during the evening

When I contacted the seller, he promised to make it right and gave me the option of ordering a perspex replacement (cost on him) or time for him to locate an original glass replacement. I opted for an original glass replacement. Within a couple of weeks, he sent the replacement over.

Boy was I shocked to see what was in the mail!!! Not only did he sent me an original glass replacement for the faceplate, he sent a complete replacement (original) faceplate with the glass in a well wrapped package!!!
Replacement received from the USA

I can't say enough of the after sales service support received from Rich Crowl of The Soundwell - 1st rate After Sales Service and truly as Good as GOLD!!!

While awaiting the arrival of the replacement glass, I tested the TU-9900 and it seem to be working fine. Unfortunately all the stations sound thin eg bass-less. Otherwise details were superbly reproduced - confirmation when hearing songs or instrumentals I listen to often. I have not done the due diligence yet (since it is working fine) as been busy with another project.

On the back, the TU-9900 has a pair of RCA(s) for variable and fixed output connectivity, as well as other facilities which I had not had time to explore yet.

After locating the service manual and reviewing the schematics, I decided to recap only the PSU board as it is a low power unit.

Top view of TU-9900. PSU board next to transformer and just next to back plate
PSU board after recap
After the recap and run in of about half a day or so, the bass was back ... and in heaps!!! Really sounds superb with rich details and solid bass.

Well worth the patience to acquire the TU-9900!


10Dec2014

Finally had time to extract the unit from storage to replace the cracked glass.

Adding the below as did not take a picture of the rear in the original post.

Rear of Sansui TU-9900
2Mar2015

Came across a webpage at FMTUNERINFO on possible DIY upgrades to make the TU-9900 even better. Have not tried any of the mods yet

Tuesday, January 1, 2013

Sony CDP-361

Was helping my friend sell his pristine condition CDP-361 since he was overseas (has since been sold). He was ok for the unit to be posted in my blog.

The CDP-361 is one of the newer generation of remote capable CD players of the mid-80's. Well built but a feather-weight when compared to my ES-series units. Even so, the CDP had no issues with CD-R or my test CD with transparent areas in the TOC (table of contents)! Body was steel all round (thin but still the real thing).

Since it was a budget CDP, it was not surprising to discover that the transport mechanism was not to the standard of the Philips CDM-2 eg will not play non-disruptively thru all the rock-n-roll of a quake aka pickup and shaken not stirred (to coin a phrase from the movies) during play!!!

As per typical Sony CDP(s), there are only the analogue outputs via RCA and a TOSLINK for digital out.

With volume control for the headphones

Only TOSLINK for digital out
With covers removed
Angled view from rear

Close-up of the main board with everything including the analogue audio components (on LHS side of board)
Suppose the unit would be great for a modder since there is so much empty space within the chassis for all the add-on(s) once could dream of!!!

How does the unit sound?

Pretty good for a stock unit. Details are reproduced with above average quality - enough to enable one to distinguish various instruments in most music genre without requiring much concentration. Good overall reproduction of the CD fed, though not to the standard of a ES-series CDP.

While testing the unit to ensure it was in ok condition, discovered the CDP can be picky on the type of inter-connect utilised - preference for plain but good quality pure copper interconnects.

Saturday, December 1, 2012

DIY simplistic tape adapter for the Quad 33

After reading about the possibility of a simplistic tape adapter for the Quad 33, I fashioned a DIY from the following PCB strip (easily obtainable from the electronic shops).
Original

I then used a small hacksaw and sand-paper to fashion the strip into a similar dimension Quad 33 Tape Adapter board. The entire job can be easily completed within an hour.

From top
View of bottom

Inserting the DIY Tape Adapter, it fit perfectly into the slot of my 2nd Quad 33 (which has been upgraded internally - need to reduce length of the board later)!

After insertion and Quad 33 in-use

Powering up was proof of a job well done.

Reproduction was revealing, especially on bad recordings - does no favours for them! And vice-versa.

As the reproduction could be a little raw at times, I tried inserting small value non-EC caps into the signal path to smoothen it out. Hence I replace the bare jumpers with a 0.047uF Russian Paper-In-Oil (PIO) capacitor in the REPLAY pathway. Made the unit sound more or less like the original 33.
With Russian PIO(s)

Then experimented with an old fashion Wima 0.33uF (original Quad value ... hmm) in-place of the PIO. The lows sound decent without the raw-ness but lack HF clearity. HF seem a little muddle. You can hear the HF details, as if they were being push into the background.
With older Wima(s)

Next step was to insert a 2pF silver mica to the REPLAY pathway, in-parallel to the Wima. The silver mica(s) act as a tonal bass-pass. And after 30min or so, the unit sounds good again - without the raw-less-ness in the reproduction.
With Wima(s) and silver mica
A few hours later, had to insert a 1uF into REPLAY as there seem to be an absence of some LF.
With 1uF added


LF's are now decent (without overemphasis), and, the HF are realistic (aka natural) due to the clearity of the reproduction.

Source is the Audiolab 8000DAC and 8000CDM, pre is the 2nd Quad 33 (internally upgraded) and power via the 3rd Quad 303 (late model) driving my Meridian speakers. The interconnect cables between the CDP and the Quad 33 was fashion from phone cables (nothing fancy). Cables between the Quad(s) are factory issued. Speaker cables are the ones I have been using since discovering their hidden talent!


NOTE:

After inserting the DIY TAPE ADAPTER into the 33, upon powering-on the 33 - DO NOT increase volume. Turn only to the point of power-on.

This is because I discovered if the inserted DIY tape adapter did not fit into the socket properly, there would be mass rumblings of sorts thru the speakers! If so, quickly turn off the unit and count to about 30 before removing the TAPE ADAPTER. Remove and re-insert properly.

Sunday, November 11, 2012

Sansui SE-7

Among enthusists, Sansui were renown for their equalisers which were sweet sounding and functional.

The SE-7 is a nice 10-band equaliser from the 1980's with volume control for both channels via a bi-channel potentiometer. The SE-7 has facilities for various dubbing/output combinations and a pleasant lighted ON/OFF button.

I remember recapping the PSU EC(s) as the unit was sounding too soft - that did the job, as it was a low power consumption unit! 

Found the following pix from my digital camera.

Sold the SE-7 a while ago as it was surplus to requirements after my other units had been recapped.

Thursday, November 1, 2012

How does the Audio Note Signature DAC compare against my recapped DAC?

The million dollar question!!!

Setup during shoot-out
Hence I took the Audiolabs from storage and connected the RCA output from the 8000CDM to the Audio Note DAC. The RCA cable is a DIY made from a single core co-axial cable intended for video. The 8000CDM XLR output was fed to the 8000DAC. The XLR cable consists of a blue Klotz for digital cable. The outputs from both DAC(s) were fed to my Magnum IA-125 which are connected to the Meridian A500(s).

Any audible differences?

I could not hear any when performing the comparison using various CD(s)??? 

Please note the 8000DAC has been recapped with better components and a few values were altered from the originals.

After listening to the above setup for a couple of weeks, I decided to let go of the Audio Note since I could not tell the difference when playing any CD and switching between the two DAC(s) during critical listening.

The buyer of the Audio Note could not differenciate them either!

Monday, October 1, 2012

Audio Note DAC One 1X Signature

Audio Note is an established and one of the well known brands in high-end hifi.

The Audio Note DAC One.1x Signature deploys (mouthful obtained from the net) a 24Bit/96KHz compatible converter, AD1865N chip, digital filter free 1xover-sampling direct from disc technology. Black Gate capacitors, Audio Note copper foil signal caps and copper wired digital input transformer in Zero style chassis, 6111WA anode (valve) with no feedback (NFB) output stage.


The unit has digital inputs for either XLR or digital via RCA via selector in the rear. There is only a single pair of RCA outputs.

The following pix(s) show the lights visible after power-up.
Upon power-up

Once DAC detecting a CD transport connection
Once CD play initiated
Unfortunately I was not able to access the unit easily to take a pix of the internals, as only the front and rear plate are removable. Internal components are secured via screws on the bottom of the shell.
After front-plate removed
Pix of the internals after front plate removal


How does it sound?

Reproduction via the Audio Note is smooth, with full and dynamically natural sonics, using the Audiolab 8000CDM as transport via a 1m co-axial single core cable.

Keep an eye for the comparison against my recapped Audiolab 8000DAC next month, with both DAC(s) using the 8000CDM for input!!!

Saturday, September 22, 2012

LG RH-1988HS

Yes I know (and agree) ... this is NOT HIFI (in any manner or form)! Best qualified hifi usage is only as a "poor man's" transport.

The only reason I am posting the item here to save all the (other) poor soul's from being tormented  by the long or many  "PLEASE WAIT"  display issue (seems to be quite common when I performed a search on the net). I would like to contact the webmaster of a LG DVD-HDD website for consideration to add the following to his list but there was no contact listed there.

Our RH-1988HS has been working fine till recently when the "PLEASE WAIT" message was being displayed more and more often!!! Shortly thereafter, the LG stopped recording properly and would shutdown within seconds after start-up e.g as if it got hit by a PC virus??? Or it would only recording material in intervals of seconds!!!

LG RH-1988HS on top of another HDD-DVD recorder

After much Google-ing, found the solution after searching the net on good old YouTUBE!

Suggested steps to fix the issue are:-

1. Note your programmed recording schedule
2. Power off the unit
3. Remove the top casing
4. Check the capacitors on the PSU board (located behind the HDD)
5. Put your finger on the top of each of the larger capacitors to "feel" for bulging e.g the 2200uF(s)
6. Remove the PSU board from the chassis and perform the replacement, once you have the necessary capacitors. I used Rubycon(s) of the same spec(s)
7. Return the PSU board with all the necessary connections
8. Power-up
9. Set the clock and re-enter the recording schedule(s)

Took the opportunity to replace all three 2200uF capacitors on the PSU board even though only two were deformed.
After removing casing (PSU board on top LHS corner, board behind HDD)

After the 2200uF capacitors were replaced

Original capacitors which were replaced

In case anyone had venture into the recorders maintainence mode and made changes without recording the original values, these are the OPCODE settings for my recorder. Please note I purchased my unit in Singapore. OPCODE(s) are different for other regions and countries. Please search the net if your unit is not for distribution in Singapore.

OPCODE(s) for my recorder
And for those interested to make your unit region free, please refer to http://www.videohelp.com/dvdhacks//8176 . Basically you need to repeat pressing the '0' 7x twice.

Saturday, September 1, 2012

Philips CD-380

Was helping my friend dispose of his CDP and he was ok for the following post in my blog.

The CD380 is a CDM4/19 based CDP without built-in remote capability. This particular model uses a TDA1543 DAC.

The CD380 can be remote capable via an external unit from Philips and connecting it via the RC5 RCA connectors. Unfotunately the external remote unit are extremely rare.

Front view

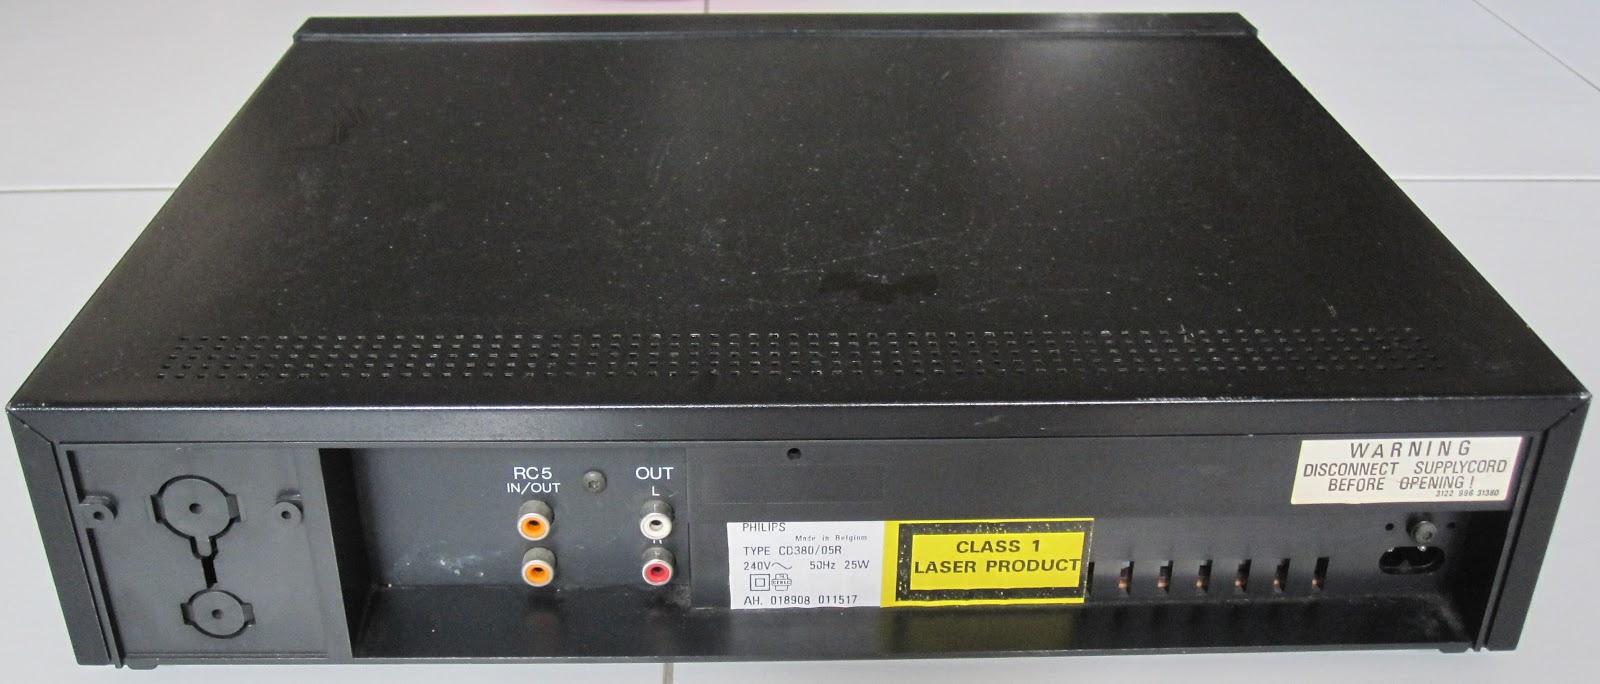
View from rear

Internals from top
The CD380 has no issues reading CD-R as well as my test CD with a degraded "see-thru" area on the TOC (Table of Contents).

How does this old gal sound? Pretty good actually for a stock unit which uses the "poor man's TDA1541"! Audio was warm and pleasant. Background details were good as well. Output via RCA(s) were low in volume. There is no volume control on the headphone output.

As  per other Philips CDP(s), the CD380 has potential to sound much better if the capacitors were refreshed and replaced with better quality components.

Wednesday, July 18, 2012

Meridian 209

The 209 is my Meridian remote to control the 201 and 602. The 204 is only activated by the 201 when utilised, and, vice-versa. The 209 has no other control over the 204.


Top


Bottom


After bottom cover removed
After insulator removed

The 209 literally eats 9V batteries for breakfast!!! Hence I had the remote codes programmed into the Philips Pronto and used it as my main remote for the Meridian components.

Sunday, July 1, 2012

Sansui B-2102

The B-2102 is the companion for the C-2102 pre-amp and is a X-Balanced System power amp.

Front view of the B-2102
There seems to be little information on the internet for the B-2012. I can confirm the B-2102 specification is similar to the B-2101. Main differences are that the B-2102 is a B-2101 with a different facade, large caps of 8,200uF instead of 10,000uF. Lastly the DISPLAY OFF switch only disables the audio feed into the meters - does not switch the meters off. Like the B-2101, the B-2102 is a scale-up version of the G90X amplifier section - with 8 transistors per side vs 8 transistors for both channels on the G90X.

Recapped the B-2102 a few years back as it was sounding dull. Came across across leaked caps on the PSU board with many very tired caps on the power amp boards. Used Panasonic ECA, FC and FM; Rubycon, Wima(s) and misc caps.

Bottom
Rear


Top with cover
Top with cover removed


Recap PSU and LHS driver board
Recap RHS driver board


8,200uF caps
Power amp board on one side


Details of the B-2101 are available on the web at specificationsbrochure-1 and brochure-2

I find the B-2102 to be sweeter than the B-2101 though the specifications are almost the same as the other model.