Sunday, September 12, 2010

Audiolab 8000A (serial number with 'F')


The Audiolab 8000A's with the alphabet 'F' in the serial number were the last production batch before Audiolab was sold to Tag McLaren.

I was lucky enough to secure a unit from a seller who lived down the road!!!. After doing so, I sold my British made Audiolab 8000S (serial number with  'E') and 8000A (serial number with 'D').

The newer 8000A still sounded "a bit raw" and less polish than the higher end units in my collection. Hence I decided to recap the unit using better quality parts, as well as performing some minor tweaking along the way.
My unit with 'F' in s/n


Original

The following pix was taken after the work was done using OSCON, Wima, Panasonic FC and ECA, as well as silver mica's.

Before Wima's inserted into pre-amp section was substituted with silver mica's 


This is what's under the big ribbon cable - the pre-amp section.
After the four silver mica's were inserted


The left side (from front) casing of the unit runs warm as the phono section has it's own voltage regulators which uses the left side of the internal casing as heat sink. I attached two heatsinks to the side to help reduce heat levels.

Took the opportunity to capture a 30second video to show the results, using my basic digital camera. The video was captured in MOV format and has not been modified in any manner of form - direct from the digicam to the PC and uploaded to the blog. 


Was quite impressed by the ability of the basic digicam, although my daughter says it does not do justice to the real setup.

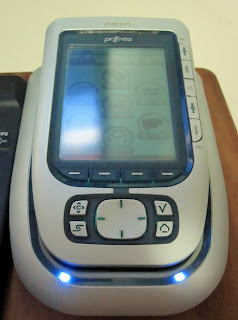
Philips Pronto programmable touch screen remote

This is the Pronto I use to control the various units in my collection ... most useful as I do not have to hunt high  and low for the originals when I take a unit from storage to listen. It is seen in it's cradle which functions as a charger as well.
Screen for Audiolab 8000CDM
Pronto charging in cradle

I programmed and customised the Pronto for the Philips CDP, Meridians, Denon HT units, TV, VCR, etc.

The model was reviewed at http://www.remotecentral.com/tsu3000/index.html and the Philips support website is at http://www.pronto.philips.com/

Saturday, September 11, 2010

Philips CD-650 (***Update#2***)

The CD650 is probably my favourite TDA1541 chipset CDP.  I have two such units - the other unit is literally  NOS!! I sold my CD880 and kept the CD650!!!

I had to recap the unit after the image produced was leaning towards the left (from front) - common issue for old Philips-based CDP(s). I had several owned a number of other Philips based CDP's (Philips CD880, 670, 460, 640, 624, 634, 482, 931, AK601; Marantz CD52 Mk1, CD52 Mk2; Mission PCM 4000, 7000) and this always happens after 10yrs of usage. 

Only the electrolytic capacitors were swap out for better quality ones - no reclocking or opamp change necessary. The only exception were four of the Philips blue poly caps which were salvaged from my dead Mission PCM 7000, swap out for the silver coloured ones in the original from the opamp area e.g 1n and 2n4.  You can see the changed capacitors in the following pix.
                                        

SK Fong heard the unit as well when he was visiting and was quite impressed - by it's condition as well as sonic qualities after the recapping. And yes it does look like it was taken out the box and this is 1986 ...

I even demo picking up the unit and shaking it vertically as well as horizontally while a CD was being played - you would not heard any skips etc aka as if it was place on a iso-platform. That's 1980's quality for you!!! 

Someone else I know with a Marantz CD50 had to place the unit on a self-made iso-platform using springs to produce similar results.

Update#1

I realised I did not mention the following. I used a Philips BC 0.027uF (blue square poly) as bypass for each of the Nichicon Muse. This was done to permit the high frequencies thru.

28Mar2011 - Update#2

Uploaded the brochure cover for the unit as these are scare on the internet.

Audiolab 8000CDM

Here is the perfect partner for the 8000DAC, the 8000CDM (a bit dusty as just taken out from storage).

CDM and DAC playing a CD recorded with EQ
In theory the "swap-out" should not have been necessary as a transport's sole purpose in life was to read the CD best it could and provide the output in digital form e.g binary 1 and 0's. Binary "1" means high, binary "0" is low. There is not suppose to be any levels of quality in sound relating to the "1" and "0"'s. The DAC then converts the digital signal to analogue signal for us to hear.

Errr ... I found much difference after the swap out was done.

Here's the front view of the 8000CDM after some of the internals were swap out.
Top front view
Bottom view

Followed by the view from the top. Have added a heatsink to the voltage regulator transistor at the back of the unit as it ran hot - not sure why they was no heatsink on it in the 1st place.

Lastly the close-up of the signal processing area which is located behind of the CD transport mechanism. Higher quality components used are OSCON, Wima, EPCOS and silver mica's as well as Panasonic ECA and Rubycon capacitors. Reclocking should not be necessary as there are IC's for PLL in this area.

View the blog for my Audiolab 8000A at http://myoldvintagehifi.blogspot.com/2010/09/audiolab-8000a-serial-number-with-f.html to see and hear how the units perform together.

Wednesday, September 8, 2010

Meridian 606

My trusty Meridian DAC was lacking in bass when compared to the past. The 602 is the transport paired to the 606.

Normally DAC's are not demanding in terms of current requirement (unless extremely old). Hence I recapped only the electrolytic capacitors related to the power portions on the PSU board (not shown) as well the DAC board. The caps in question are the five from the bottom half of the board - up to width of the two sets of ribbon cables.

DAC board

Once done, the good ol'bass was back!!!

602 with companion 606

Note:
The 606 has no standby mode since it was designed to be left on for optimum performance.

Meridian 204


The Meridian 204 tuner needs no introduction. It is a respectable sounding tuner with good reviews on the net. One such example can be sampled at http://www.fmtunerinfo.com/reviewsM-N.html#meridian

201 and 204 in stand-by mode
Rear of 204

Due to age, the battery on the main tuner board was leaking and there was a thin layer of "sticky" dark green slime around it - can't really see from the pix. The battery is the Varta with a '+' sign between the Nichicon capacitors.

When I rung the local agent, they quoted $200!!! to service the unit aka replace the battery and clean-up the "slime"! I though it was steep, way WAY steep for such a simple job.

Hence I decided to change the old battery and take the opportunity to recap the electrolytics myself.

After some scouting around, I manage to locate the following replacement from a supplier at Sim Lim Tower for about $20.

Works like a charm ... had to use contact cleaners to gently clear up the "slime". Otherwise the motherboard could be rendered useless after a while.

Sorry did not take a pix of the unit after completing the job.


Will update with more more pix(s) of the unit in action once I have time to reconfigure the 204 and setup the entire Meridian set which currentlycomprises of the 201/204/209/602/606/557 and A500